Get ready to satisfy your sweet tooth with these indulgent caramel apples! This classic treat, made with just three ingredients, is perfect for any occasion, especially during the fall and Halloween. In this comprehensive guide, we’ll explore everything you need to know about crafting the perfect caramel apples, from the best ingredients to expert tips and variations. Whether you’re an experienced home cook or just starting your culinary journey, hitting your protein goals with tasty food is achievable. Let’s dive in!
Why You’ll Love This Recipe
There are countless reasons to love caramel apples, but here are five that stand out:
- Quick & Easy: With only three ingredients, you can whip up these treats in no time, making them perfect for impromptu gatherings or fall festivities.
- Customizable: The toppings are entirely up to you! From nuts to sprinkles, there’s no limit to how you can personalize your caramel apples.
- Fun for Everyone: This is a great recipe for kids and adults alike. Get the family involved in dipping and decorating for a fun kitchen activity.
- Great for Entertaining: Impress your guests with this delightful dessert that looks as good as it tastes, making it a hit at parties.
- Perfect Fall Treat: There’s nothing quite like enjoying a caramel apple during the fall season. The combination of sweet caramel and crisp apples captures the essence of autumn.
Ingredients You’ll Need
Here’s what you’ll need to create your delicious caramel apples:
- 6 unwaxed apples: Ensure they are completely dry and free from any wax coating. This helps the caramel stick better.
- 6 candy sticks: These will serve as the handles for your caramel apples.
- 14 oz (400g) chewy caramel candies: Use high-quality caramel for the best flavor and texture.
- 2 tbsp cream, milk, or water: This helps to melt the caramel smoothly.
- Toppings (optional): Consider sprinkles, chopped nuts, or crushed candy bits for additional flavor and texture.
Step-by-Step Directions
Follow these simple steps to create your caramel apples:
- Prepare the apples: Remove the stems from the apples and insert the candy sticks into the center. Line a baking tray with a silicone mat or wax paper and lightly spray with non-stick cooking spray.
- Prepare the caramel: Unwrap the caramel candies and place them in a small saucepan. Add the cream (or milk) and heat over medium-low, stirring constantly until completely melted and smooth (about 3-4 minutes).
- Dip the apples: Tilt the pot or bowl to make dipping easier. Rotate each apple until fully coated in caramel, then hold it upright to let the excess drip off. Scrape the bottom against the pot’s edge to prevent a puddle of caramel.
- Add toppings: If you’re using toppings, roll the caramel-dipped apples immediately after dipping. This ensures they stick well.
- Chill: Transfer the decorated apples to the prepared baking sheet and place them in the fridge for about 30 minutes to allow the caramel to set.
Pro Tips for Perfect Caramel Apples

Level up your caramel apple game with these expert insights:
- Use unwaxed apples: Wax can prevent the caramel from sticking properly. Make sure to wipe them down with a paper towel to remove any residue.
- Heat carefully: If you’re using a microwave to melt the caramel, do so in short bursts and stir frequently to prevent burning.
- Choose tart apples: The contrast between sweet caramel and tart apples creates a delightful balance of flavors. Varieties like Granny Smith work wonderfully.
- Don’t rush the chilling: Allow enough time for the caramel to set in the fridge. This not only improves texture but also enhances the flavor.
- Experiment with flavors: Feel free to add spices to your caramel or use flavored coatings for a unique twist.
Common Mistakes and Troubleshooting
Even the best can encounter hiccups when making caramel apples. Here’s how to avoid common pitfalls:
- Caramel won’t stick: If your caramel isn’t adhering to the apples, ensure they are dry and unwaxed. A quick wipe with a paper towel can help.
- Caramel is too hard: If the caramel sets too hard, try adjusting the cream or milk ratio. A little extra moisture can help achieve the right consistency.
- Apples fall off the sticks: Ensure the sticks are inserted deep enough and that you let the caramel cool slightly before dipping.
Variations to Try
Want to mix things up? Here are some fun variations on the classic caramel apple:
- Chocolate-Covered Caramel Apples: After dipping in caramel, coat the apples in melted chocolate for an extra layer of decadence.
- Nutty Caramel Apples: Roll your caramel-coated apples in chopped nuts like pecans or almonds for a crunchy texture.
- Spiced Caramel Apples: Add cinnamon or pumpkin spice to the caramel mixture for a warm, autumnal flavor.
- Mini Caramel Apples: Use small apple varieties for bite-sized treats, perfect for parties or kids.
Storage and Make-Ahead Instructions
Caramel apples are best enjoyed fresh, but you can store them if needed:
- Refrigeration: Store in an airtight container in the fridge for up to 5 days. Allow them to come to room temperature before serving.
- Make ahead: You can prepare the apples a day in advance; just be cautious with toppings that may get soggy.
Comprehensive FAQ
Got questions? Here are some answers that might help:
- How long do caramel apples last? They can last up to 5 days in the fridge, but they’re best enjoyed fresh.
- What are the best apples to use? Tart varieties like Granny Smith are ideal as they balance the sweetness of the caramel.
- Can I use store-bought caramel? Absolutely! Many brands offer ready-to-use caramel for convenience.
- How do I prevent caramel from hardening? Monitor the heat carefully and add a bit more cream or milk if it thickens too quickly.
- What toppings go well with caramel apples? Sprinkles, crushed cookies, nuts, and candies all make excellent toppings.
- Can I make these vegan? Use dairy-free caramel and plant-based milk to create a vegan version.
- What if I don’t have candy sticks? Skewers or even sturdy toothpicks can serve as alternatives.
- How do I store leftover apples? Keep them in an airtight container in the fridge to maintain freshness.
Nutritional Tips and Dietary Adaptations
While caramel apples are a treat, you can make them a bit healthier:
- Choose organic apples: They are typically free from pesticides and wax, making them a healthier choice.
- Consider sugar-free caramel: For a lower-sugar option, look for sugar-free caramel candies.
- Add protein: Consider sprinkling some protein powder into your toppings for an extra nutritional punch.
Equipment Recommendations
To make your caramel apple-making experience seamless, consider these essential tools:
- Silicone baking mat: Prevents sticking and makes cleanup a breeze.
- Small saucepan: Ideal for melting the caramel evenly.
- Spatula: Use a spatula to help scrape excess caramel and for smooth dipping.
Serving Suggestions
Caramel apples are fantastic on their own, but you can elevate the experience:
- Pair with ice cream: Serve alongside vanilla or cinnamon ice cream for a decadent dessert.
- Serve at parties: Create a caramel apple bar with various toppings for guests to customize their own.
- Include in dessert platters: Add them to dessert trays for a beautiful and colorful presentation.
Conclusion
With this complete guide to making indulgent caramel apples, you’re now equipped to create a delightful treat that everyone will love. Whether it’s for a special occasion or just a fun family activity, these caramel apples are sure to impress. Remember, hitting your protein goals doesn’t mean sacrificing taste—get creative, enjoy the process, and most importantly, have fun in the kitchen!
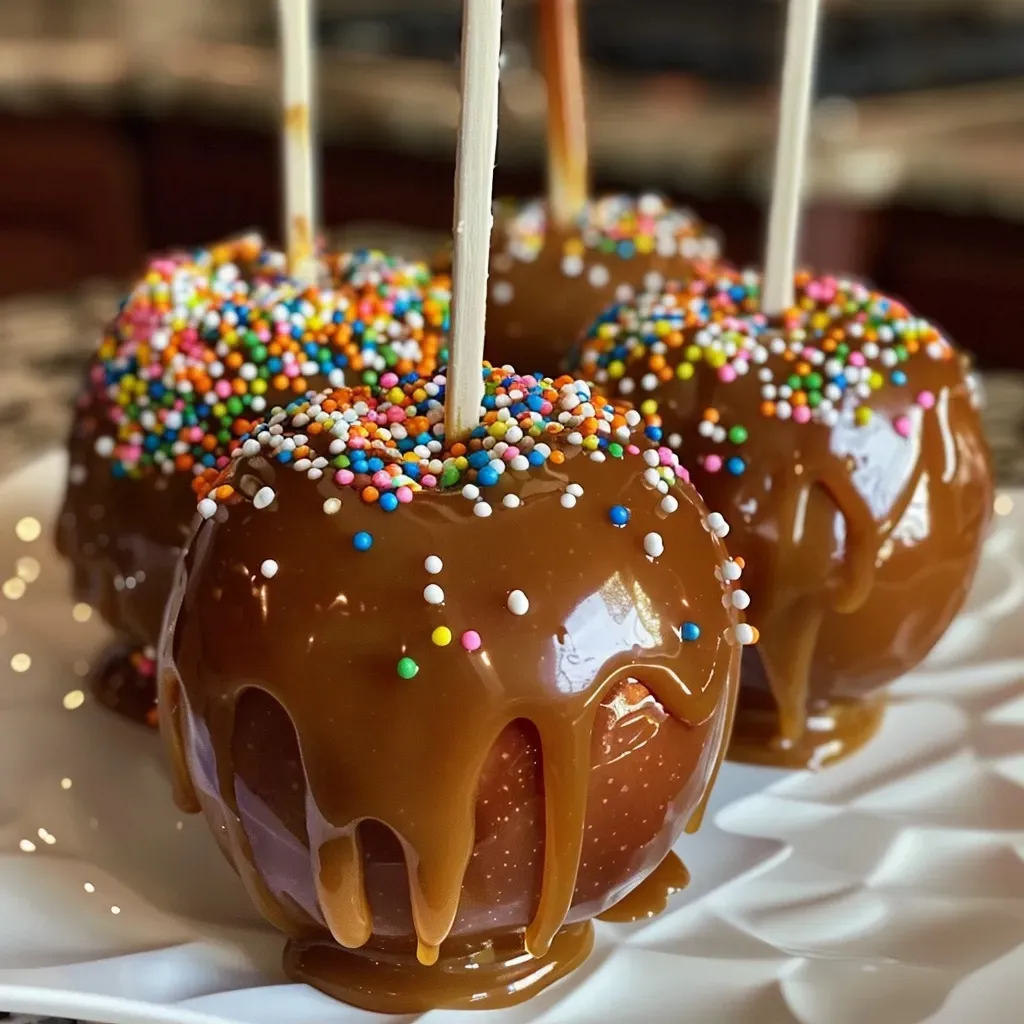
Caramel Apples {Just 3 Ingredients}
Ingredients
Fruits
- 6 pieces apples, unwaxed and completely dry (see notes below)
- 6 pieces candy sticks
- 14 oz chewy caramel candies
- 2 tbsp cream, milk, or water
- toppings such as sprinkles, chopped nuts, and candy bits optional toppings (optional)
Instructions
- Remove stems from apples, insert candy sticks, and prepare toppings.
- Unwrap caramels, add cream or water, and melt in a saucepan over medium-low heat, stirring until smooth.
- Dip apples into the melted caramel, rotate to coat evenly, then let excess drip off.
- Roll caramel-coated apples in toppings if desired, then place on a prepared tray.
- Refrigerate for 30 minutes to set the caramel.